|
Why I clean tools Nothing frustrates me more than buying a dirty old tool for a lot of money only to find it broken or fixed when I clean it. Tough luck, I should have left it as found! If so, who displays a tool like this? I mean, have you ever been to a museum and walked along rows and rows of dirty old stuff? Have you ever seen a major tool collection made up of rusty bits, green and black tarnished brass and anaemic thirsty old wood? Bring out the Brasso, open that bottle of linseed oil and get cleaning! Every good tradesman cleans his tools and if one more idiot tells me that shining up a brass plane or rubbing linseed oil on a wooden plane is a cardinal sin I�ll probably kill him buy putting his head under my buffing wheel. Don�t get me wrong, I�d prefer to leave my tools just as I got them. Some tools simply look perfect, not necessarily like new, just perfect as they came out of the toolbox. Maybe the former owner cleaned them years ago, maybe time was kind to them and they aged gracefully but if they haven't I sure want them clean enough to be sold to a lady in white gloves. 1. Don�t use anything time won�t heal This is rule one and the only one you need to remember. No matter how much you clean brass or wood with a soft cloth, in a few years time nobody will be able to tell the difference. That�s cleaning. If you use a wire brush or sandpaper to clean the same surface you�ll get the brass clean but you�ll be left with marks or a different surface. That�s killing a tool - not cleaning!
For commercial operators like myself, cleaning is not the preferred option. It�s time consuming and that cuts out a lot of the low value pieces. This alone makes sure that I clean only a small fraction of my tools. Other restraints are just as important. Why shine up a set of moulding planes that look perfect apart from a bit of dust? Wipe it off with a cloth and some mineral turps. However, an 18th century super-duper-complex-moulding-plane you had to wrestle out of the hands of a reluctant seller might be a different prospect. If you don�t want an argument with your wife about bringing dirty old tools into the lounge room you�d better hurry to the shed and make this one presentable before you put it on the mantle piece.
Whether you do your laundry, remove stains or restore a priceless 15th century painting, you always start with the harmless stuff first. No need to king hit a bit of dust with paint stripper when a wet rag will do the job. I found that nothing really beats mineral turpentine. I go through gallons of the stuff. I use a fairly large old baking tin for most of my cleaning jobs. It�s perfect for soaking those grimy and rusty metal planes, too. Wooden planes I clean with turps and triple or quadruple O steel wool. Don�t rub too hard, just enough to take the excess dirt off. Some dirt will be hard and in many layers, that�s what the purists call history or patina and I think they are correct, so you just leave that alone. For most of the wooden tools this is all you need. Let it dry and apply some linseed oil or good quality furniture wax and rub off any excess with a soft cloth. There are some great products on the market, usually called buffing wax or similar, they work well without much effort. Linseed oil is the traditional and cheapest method of protecting wood. It's available in different degrees of purity. They all work ok, especially if you thin them down with mineral turps. Key is not to use too much and wipe off all the excess. However, I feel it is time to break with tradition and use modern wax or finer oil products instead. Regular and prolonged use of linseed oil on wooden planes over 20 or 30 years changes the aging process and the colour of the wood. Linseed treated beech planes tend to redden over time. I find it NOT all that suitable for humid or wet conditions as we have in Queensland. If you apply too much it will leave the wood sticky or bleed it out over long periods, attracting mould and dust that leaves your tool with a dull, dark surface. Make sure you don't over-apply any product you use as a finish on your tools.
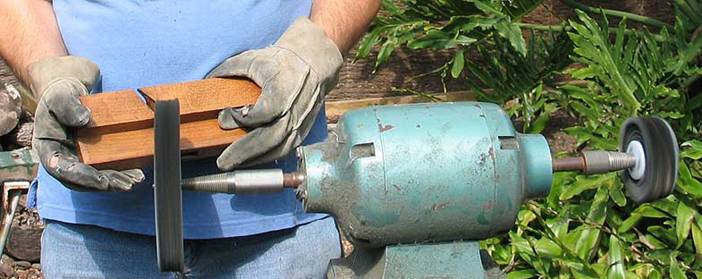
Metal planes are a lot harder to clean with steel wool and turps. Take them apart first. Now you�re dealing with wooden handles and knobs (see above), steel cutter and cast iron body parts. Most Stanley type planes have japanned beds. I prefer to leave them as is, even if they don�t have much japanning left. Some tool guys swear they can copy japanning but I have to see a convincing job yet. I�d rather leave 30% japanning than re-paint a bed. I clean it with turps and steel wool, paint splatters I remove with a knife-point. You can use black paint for a touch up, experience will teach you how much is too much. Treat the frog in the same way. The sole and sides are a completely different matter. I use a blunt knife or scraper to get rid of excess rust and some fine grade wet or dry abrasive paper. Same treatment for the cutter, the back iron and the lever cap. If the nickel plating is ok don't wreck it with abrasive paper. Most of the times it's not. I prefer to remove all the loose flakes. English infill planes are a bit trickier, they combine wood and steel or iron. Special care is required when working the lines between the different materials. Once the tool is clean it�s time for the buffer. So make sure you understand this: The tool is more or less clean before it hits the buffer. If you try to buff a dirty tool you�ll spend a lot of time getting nowhere, create a lot of dust and wreck every crisp edge. Clean with care and buff with measure. 5. Buffin ain�t buffin I remember the horror I felt when Reg Eaton told me years ago that he buffed his tools. This guy invented tool dealing, how could he! Then he showed me his workshop and I went out and bought my own wheel. Most people associate buffing with a grinder, wire brush or similar torture instrument. Not even close. All you want is the grinder motor with an empty spindle. Attach a soft (loose) cloth buffing wheel. Stitched buffers are ok with steel but are too hard for wood and soft metals. I use a motor with two spindles and a hard (stitched) cloth on the left and a soft one on the right. Put a small amount of buffing compound on the cloth and get buffing. You can buy any number of different compound sticks for different applications. I found the brown/red general purpose is perfect for most jobs. Some people use wax or their own home-made brew. Compounds have some mild abrasive properties so don�t over-use.
It's a good idea to work with several different wheels. Larger diameters are great for bigger surfaces but useless if you need to clean the bed of a block plane, the inside of a lever cap or any other fiddly bits. Keep all the used wheels and change them at different stages so that you have a good selection with different diameters available. Buffing is an extremely dirty job, make sure you wear protective gear - gloves, safety goggles and a good dust mask. I used to buff in the shed but the dust drove me outside. This has created some new problems. The cloth wheels tend to grab anything you put on them at a funny angle and propel it all over the place. Not so long ago I launched a glue pot over a six foot fence right into the middle of my neighbour's back yard. I fired countless bullets of small plane parts into my shed wall and had them ricochet all over the yard. Not a good idea if the bullet is the part of a super rare Stanley plane! I've spent hours on my hands and knees searching through the grass - and I have to tell you that I have found each and every one! As my business grew I tried to pay somebody to help me with the job. One of my older friends was keen but gave me back the buffer after two weeks, he reckons the vibrations went straight to his head. A young bloke had a go and came back with a nasty carpet burn on his arm - it's obviously not an easy job. You need a lot of practice to work out the correct angle, the amount of pressure and so on. I found that most new users underestimate the amount of pressure they need to apply. You have to press quite hard, especially if you buff cast iron or steel - to a point where you actually slow down the wheel. Wood is probably easiest to buff. You can take a dirty old marking gauge straight into the buffer and have a perfect result in five minutes. Just as easy are plumb bobs and other solid brass objects. Forget all that rubbing with Brasso, the wheel does the job in a couple of minutes. If you pre-cleaned your tools well, buffing just adds the finishing touch. It gives the wood a nice shine - even without applying wax or oil at all. Metal parts, too end up clean and shiny and whatever life there is left in that japanned Stanley bed will show its true colour once more. 6. The radical treatment should be reserved for the hopeless cases. You'll find that some tools simply won't respond to all your cleaning efforts. Those are the ones you wish you hadn't touched in the first place. But it's too late now, you have just spent half the morning on an old plough plane and all you have achieved is to make it look as though it has the measles. At this point of no return I usually bring out the big guns. If the wood on your Norris plane looks like a zebra you should consider stripping it back and starting again. Under all that black gunk Norris used after WW2 there is actually quite nice beech wood that looks very nice when polished. It's not how the tool was sold originally but I guarantee it will sell a lot better now. Your sick-looking plough plane, too might need stripping. Most of the time rubbing it hard with steel wool and mineral turps is enough. Hard cases will have to be stripped with paint stripper. Let the poor victim dry out, then build up a new finish with oil, wax, shellac or whatever is appropriate. Sometimes colour matching is required. This can be achieved with a good selection of wood stains, saw dust and dirt rubbed in the mix. Heat is a good agent, too. The harder buffing wheel actually "burns" wood quite well if you press hard enough. It's not a good idea to put your moulders in the oven for the ageing process. I almost burned down our house and my restoration projects were barred from the kitchen henceforth. 7. The lazy man's solution is either not to clean or to find a short cut. I can easily live with dirt collectors but I have a real problem with the short cut brigade. They include the "electrolysists" and the chemists. Electrolysis removes rust the easy way but those currents don't make a distinction between useable cast iron and unwanted rust. They attack everything they can get their nasty little teeth into. Same goes for all those chemical "treatments". One bloke told me it was all natural. He bathes his tools in sugar molasses. I've seen the results. Molasses cleans and removes a good part of the cast iron as well. You can always pick those tools. They all end up with a dull, rough finish as though they had been sand blasted.
|